
Smoothen Edges Using Anti Aliasing in Photoshop
When making selections in Photoshop, you often get ugly jagged edges that will make your images look unnatural and fake, if you for instance, want to mix two images together in a composite. However, by using anti-aliasing, you get more natural-looking selections in Photoshop.
Get my eBook: 25 Techniques all Photographers Should Master - for Free
What is Anti Aliasing in Photoshop?
Anti-aliasing is an option that you can enable in the selection tools in Photoshop, including the Lasso, Magnetic Lasso, Polygon Lasso, Elliptical Marquee tool, and the Magic Wand tool.
Anti-aliasing helps smooth the jagged edges of the selections you create using the above tools, by feature softening the transition colors between the background and edge pixels. You don't lose any pixels in the selection because it is only the edge pixels that Photoshop tweaks the color in.
If you create composite images or otherwise cut, copy, and paste selections in Photoshop, anti-aliasing can be very useful for getting a good result.
How to Turn On Anti Aliasing in Photoshop
In order to use anti-aliasing with your selections, you need to turn it on before making the selection.
Step 1: Choose One of the Selection Tools
In our example, we will choose the Magic Wand Tool, but you can also use most of the other selection tools, like the Lasso tools or Elliptical Marquee tool.
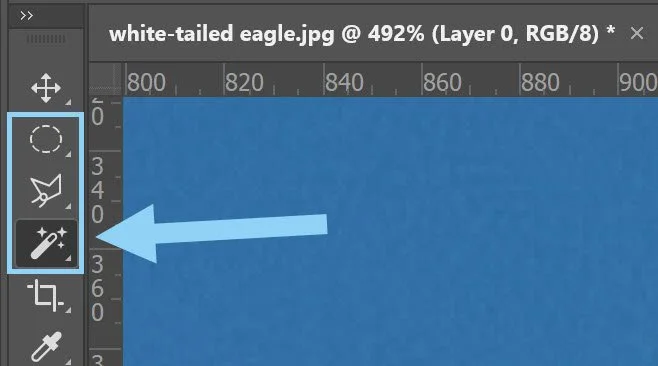
choose selection tools PS
Step 2: Turn on Anti Aliasing in the Options Bar
With the proper selection tool enabled, find the anti-aliasing check box in the options bar and make sure it is checked.

enable anti aliasing in Photoshop
Step 3: Create your Selection
Now you can select the parts of your images that you want to include in your selection.

create selection

How to Turn Off Anti Aliasing in Photoshop
If you want Photoshop to avoid anti-aliasing your selections, you only have to deselect it in the options bar whenever you have the proper selection tool activated. Then you have to create the selection again.

turn of anti alias
Brushes, Pencils, and Anti-aliasing
The sharp observer might have noticed that there isn't any anti-alias option available in the options bar for the Brush tool and the pencil tool.
This is because it is not a selection tool.
If you want an anti-alias effect when using the brush, you can instead lower the hardness of the brush a bit.
If you want Photoshop to turn off anti-aliasing for brushes, you should instead use the pencil tool, as it draws hard edges.
Related Photoshop Articles:
Concluding words
In this short tutorial, you have learned how to apply anti-aliasing in Photoshop when creating selections. This will help you get better results when cutting, copying, and pasting selections in Photoshop.