
How to Invert a Mask in Photoshop
Have you ever selected a subject in Photoshop but actually wanted to select the opposite. Well, this is where Photoshop's invert mask comes in handy. The invert mask tool allows you to select the easiest object and still create precise masks in Photoshop.
Get my eBook: 25 Techniques all Photographers Should Master - for Free
The Quickest Method to Invert Mask in Photoshop
If you are in a hurry, use the keyboard shortcuts to invert a layer mask in Photoshop, when the mask is already created.
Step 1: Select the Layer Mask
First of all, you should make sure that you selected the layer mask in the Layers Panel. You do so by clicking on the mask icon so you can see the white corners indicating that the mask is selected.

select layer mask in Photoshop
It is essential that you click on the layer mask thumbnail and not the layer itself.
Step 2: Use the Shortcut
With the layer mask selected, apply the keyboard shortcut Command + I (on a Mac) or Ctrl+ I (in Windows).
With the mask inverted, everything that was previously white (visible) on the mask is now black (invisible), while everything that was previously black and hidden is not white and visible.

inverted mask in Photoshop
Using the Menu
Still, with the layer mask selected in step 1 above, you can invert the mask by using the menu instead of using shortcuts as in step 2 above.
To do this, go to Image > Adjustments > Invert.

Invert layer mask using the menu
With the layer mask selected, you can invert it using the menu. If you accidentally selected the layer instead of the mask, you will invert the image.
How to Apply a New Mask as Inverted from the Start
Normally, when you create a new and blank layer mask, it starts as a completely white mask showing everything on the layer.
If you instead hold down the Option/Alt button when clicking on the New Layer Mask icon, you start with a black mask that hides everything on the layer.
Applying a New Inverted Layer Mask with a Selection
If you have already created a selection where you want to turn the opposite of the selection into a new mask, you can use the same approach.
When you have created your selection, use the Option/Alt key and click add a layer mask from the Layers Panel to create an inverted mask based on your selection.

invert when creating layer mask PS

How to Invert Mask when Duplicating the Mask
Normally, when you want to duplicate a layer mask, you can use Option + drag the layer mask thumbnail (using a Mac) onto the layer to which you want to copy the mask. If you use Windows, use Alt + drag the layer mask thumbnail to the new layer to copy the mask.
Now, if you want to invert the layer mask while copying it, you also need to hold down SHIFT while doing the above. So you should do this:
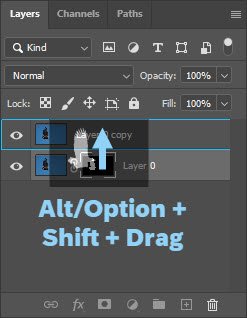
invert when duplicating
Mac: Option + Shift + click and drag the layer mask to the other layer
Windows: Alt + Shift + click and drag the layer mask to the other layer

mask PS
Result of inverting the mask when duplicating the layer. Notice how the top layer mask is opposite of the lower layer mask
Related Photoshop Articles:
Concluding words
As you have learned, working with layer masks and inverting them is quite simple. You can use both keyboard shortcuts, use the menu or invert the mask at the same time as creating a new layer.
Do you have a particular workflow for working with layer masks? Share it in the comments below.