
How To Use Smart Filters In Photoshop
Using smart filters is a great way to edit your photos in photoshop without being destructive. Usually, when applying a filter in photoshop, the filter is applied directly to the image itself. Therefore, once you save, you cannot go back and remove the Filter. This is known as destructive editing, and as a general rule, you should avoid it.
Get my eBook: 25 Techniques all Photographers Should Master - for Free
What Is A Photoshop Smart Filter?
A smart filter solves the problem of destructive editing by applying the filter to a smart object, which contains the layer. Any changes made to the image are applied to the container and not to the image itself, so you can always go back if you change your mind.
How To Create a Smart Filter in Photoshop CC
Before you can add a smart filter in Photoshop your need to convert your layer to a Smart Object.
Step One: Convert Layer To Smart Object
Select your background layer image
Right-click and select Convert To Smart Object

convert to smart object
Your layer thumbnail should now have a small icon in the bottom right-hand corner indicating that this layer is a smart object
Alternatively, you can also go to Filter > Convert for Smart Filters.

convert for Smart Filters in Photoshop
Step Two: Apply Your Photoshop Filter
There is no special smart filter list in Photoshop. By adding any filter from the range of photoshop filters available, it will be applied as a smart filter. Simply select your filter from the filter menu. Once you have adjusted and applied, the filter will automatically be applied as a ‘smart filter’.

Filter Sharpen > Sharpen

Editing A Smart Filter
The great thing about smart filters is that you can come back and edit them at any point, or remove them if you need to. There are three main ways to edit a smart filter: by editing the filter settings, editing the filter layer mask, and editing the blend modes/opacity - we’ll cover all of them.
Edit The Filter Options
With a smart filter, you can easily adjust the original settings of your filter.
To edit the filter, double click the name of the filter, which can be found stacked underneath the smart object layer. (If you can’t see it, you may need to toggle the arrow to the right-hand side of your smart object layer.)
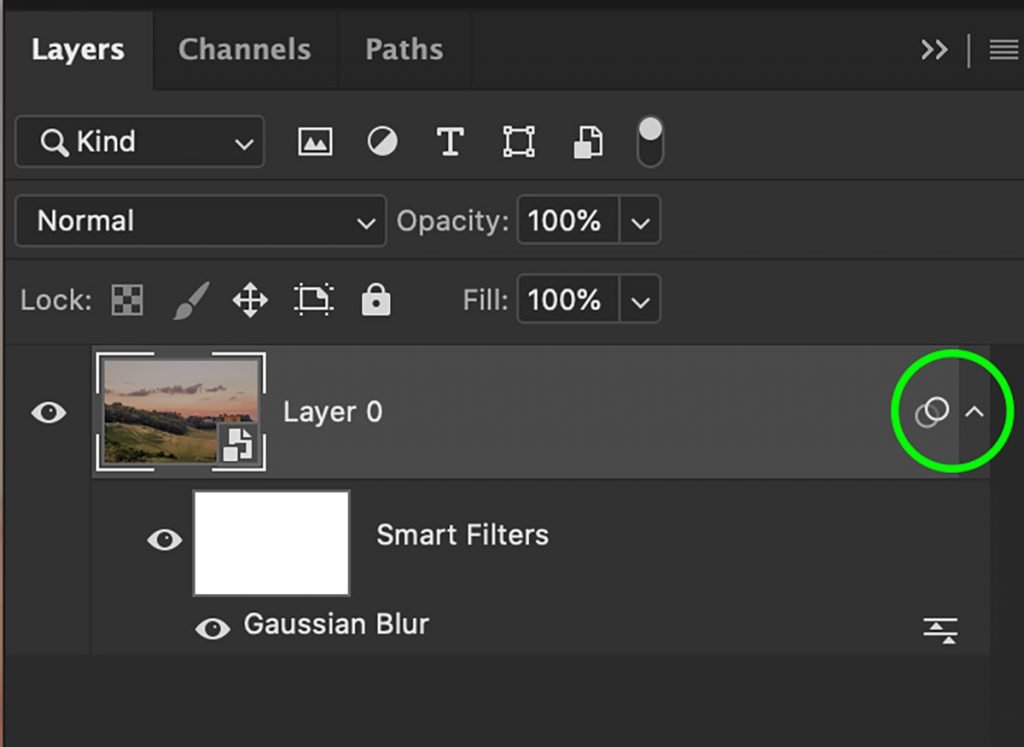
Smart filter icon
An adjustments panel will open, allowing you to adjust the filter settings to your liking. Check the ‘preview box’ to see your changes happening in real-time.

Gaussian blur
Edit The Filter Layer Mask
Smart filters automatically have a layer mask applied to them. A layer mask is a mask over your layer that controls the transparency of the layer.
White sections of the layer mask have full transparency, as a result, the layer they are applied to is shown. Black sections of the layer mask have 0% transparency and so the layers beneath are shown. Gray will show 50% transparency, etc. This allows you to non-destructively remove elements of your filters, by simply ‘painting’ them black in the layer mask.
To edit the smart filter layer mask:
Select the white thumbnail labeled ‘smart filters’
Press B on your keyboard to easily select the brush tool.
Set your brush color to 100% black (this will completely remove any part you paint over - if you still want some of your filter to show through, set the color to gray)
Paint over any areas you want to hide your filter.
Note: this method will apply the layer mask to all of the smart filters applied to this smart object.
How to Move Smart Filters in Photoshop
You can move a smart filter by dragging it onto another Photoshop layer that is already converted to a smart object. You can not move it onto ordinary Photoshop layers.
Ordering Smart Filters
As with ordinary layers and filters in Photoshop smart filters also affect what is beneath it in the layers panel, but not above it. So the ordering sequence of your smart filters is important.
How to Copy Smart Filters
In Photoshop you can copy smart filters by holding down the Option/Alt + Shift key while dragging the smart filter onto another smart object layer. Again, you cannot copy individual smart filters to ordinary layers.
If you instead want to duplicate both the smart object and the smart filter, you just need to select and duplicate the layer by pressing Cmd/Ctrl + J.
Edit The Blending Modes And Opacity of A Smart Filter
Altering the blending modes and opacity can produce a variety of fun effects with smart filters - something you wouldn’t be able to do with regular photoshop filters.
To edit the blending mode and opacity on a smart filter:
Double-click the slider icon to the right of your smart filter layer.
This will open a dialog box where you can adjust the blending options or opacity of the smart filter. It’s a good idea to try a few different options and see what combination works best.

Blending options
How to Remove Smart Filters in Photoshop
If you decide that you don't want the filter effect altogether, you can easily remove it. Right-click on the smart filter and select Delete Smart Filter.
Related Photoshop Articles:
Final Thoughts
Smart filters are an incredibly useful photoshop feature, and more easy to understand, than most think. Although they can seem a bit intimidating and complicated at first, once you understand how to apply smart filters in Photoshop and get the hang of them, they will make editing in photoshop much easier.