
How to Use the Eraser Tool in Affinity Photo
The Eraser Tool is a basic tool that can help you in many situations. It has a little bit of a learning curve, but if you understand how it works, you’ll find that it comes in handy. And, like always, Affinity Photo makes things very easy for you by providing a clean interface, easy-to-use tools, and a fluid workflow. Here is everything you need to know about the Eraser Tool in Affinity Photo.
Get my Beginner-friendly Quick Start Guide to Affinity Photo - for Free
What is the Eraser Tool in Affinity Photo?
The Eraser Tool is a group of three tools that allow you to erase an object or area from an image. The tools are:
Erase Brush Tool: It uses a brush to erase pixels regardless of their properties
Background Erase Tool: It uses a brush to erase pixels of a particular color
Flood Erase Tool: It erases pixels from a large area of the image based on color

Eraser Tool in Affinity Photo
The Eraser Tool is a destructive functionality, meaning the program lets you use it on the Background layer and doesn’t recover the erased pixels. However, you can still use the Undo functionality or History panel to retrace your steps. But it’s good practice to use the Eraser Tool on a different layer than the original.

When to Use the Eraser Tool in Affinity Photo
The Eraser Tool is useful when you want to erase pixels from a layer. In essence, you can use it just like you use masks in Affinity Photo.
For example, you can use the Eraser Tool to change the color of an object. In this case, you add a Fill layer in the new color underneath your image layer and erase the pixels from the image layer to let through the solid color. The opacity of the Erase Brush controls the subtlety of the change. With 100% opacity, you completely erase the original pixels. Anything less than 100% keeps the appearance of the original pixels and produces a more subtle change.
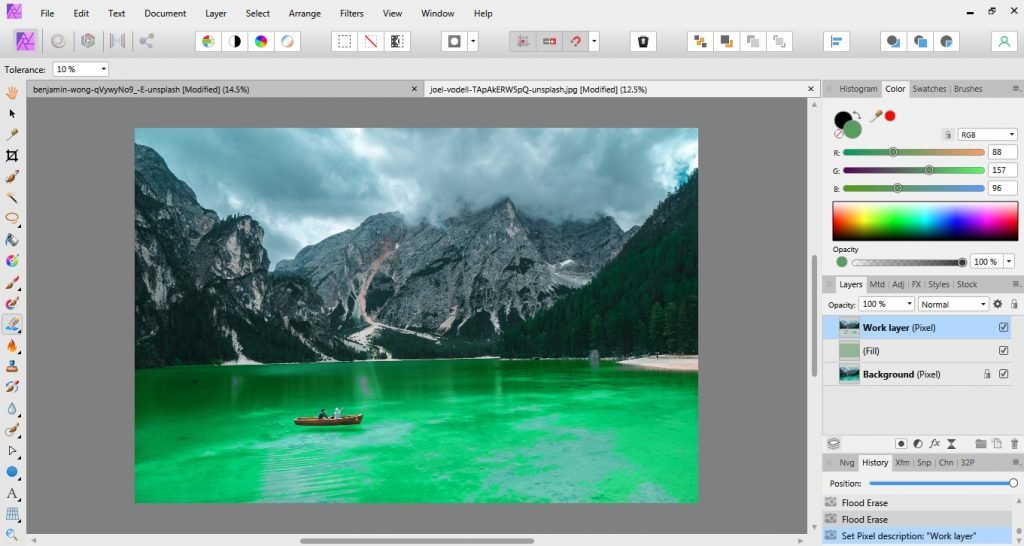
The Background Erase Tool may work better for changing the color of an object. For changing the color of a large image area (e.g., the sky, a lake, etc.), you may try the Flood Erase Tool.
You can also overlay two images and use the Eraser Tool to add an object from one image to another. In this case, set the top layer's opacity to 50% to see what's underneath and erase the pixels from above the object you want to reveal. The Erase Brush Tool is the best option for this scenario.

Photo by Joel Vodell on Unsplash
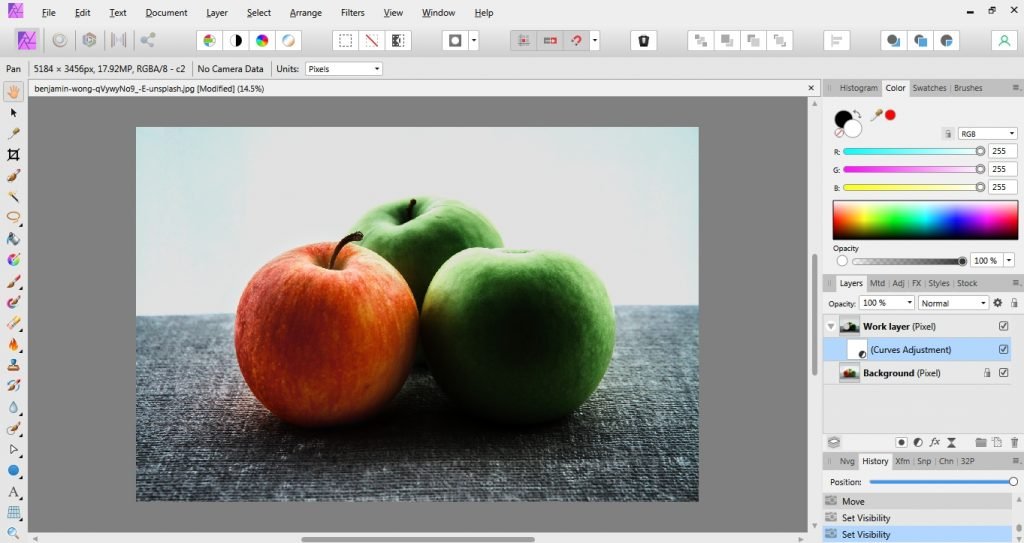
Another scenario in which the Eraser Tool is useful is when you want to apply adjustments only to a part of the image. Instead of using selections and masks, you can duplicate the image layer, erase the part of the image you don’t want to change, and apply adjustments only to the remaining pixels.
How to Use the Eraser Tool in Affinity Photo
Each tool from the Eraser Tool group performs better in a particular scenario. The following instructions give you an idea of how to use the Eraser Tool, but you should always consider your workflow and artistic purpose before starting to edit a photograph. Make sure you preserve the original image, as all three tools from the Eraser Tool group are destructive.
Step-by-Step: How to Use the Erase Brush Tool to Apply Adjustments
Step 1: Open the Image in Affinity Photo
Go to File -> Open and choose the image you want to edit.
Step 2: Duplicate the Background Layer
With the Background layer selected, right-click to make the contextual menu appear. Then, choose Duplicate. Alternatively, go to Layer -> Duplicate. To rename the new layer, double-click on it and write the new name. To visualize the effect of the Erase Brush Tool in real time, hide the Background layer by un-checking the box near its name.
Step 3: Select Erase Brush Tool
With the new layer selected, go to Erase Tool group from the Tools panel (or press E) and choose Erase Brush Tool from the dropdown menu. A context toolbar will become active to allow you to set up the parameters of the brush.
Step 4: Customize the Brush
Go to the Brush panel and choose a brush. Then, use the context toolbar to set the width, opacity, flow, hardness, and the rest of the brush parameters. Opacity dictates the strength of the tool: 100% opacity will completely erase the object, while a lower value will add transparency. Hardness dictates the accuracy of the brush: 100% hardness means a brush with sharp edges, while a lower value produces a brush with fuzzy edges. If you want to remove an object with sharp edges completely, set 100% opacity and hardness. Match the width of the brush with the size of the object you want to erase.
Note: To activate the Brush panel, go to menu View -> Studio and check Brushes.
Step 5: Erase the Object
Keep the mouse over the object you want to erase until the program shows the checked pattern. Then, click or drag the mouse over the pixels you want to erase. You can either use a large brush and erase the entire object with one click or a smaller brush and drag it over the object multiple times.

Step 6: Apply Adjustments
Add a new adjustment layer by selecting it from the Layer -> New Adjustment Layer menu or the Adjustments list in the Layer panel. Set the adjustment parameters according to your purpose. Then, rearrange the layers by dragging the adjustment layer inside the layer with the erased object. Now, the adjustments will only work on this layer. Therefore, once you activate the Background layer, the erased object will look like the original image, while the rest of the frame will include the effect of the adjustments.

Step-by-Step: How to Use the Background Erase Tool to Change Background
Step 1: Open the Image in Affinity Photo
Go to File -> Open and choose the image you want to edit.

Photo by Chris Lawton on Unsplash
Step 2: Duplicate the Background Layer
With the Background layer selected, right-click to make the contextual menu appear. Then, choose Duplicate. Alternatively, go to Layer -> Duplicate. To rename the new layer, double-click on it and write the new name.
Step 3: Select Background Erase Tool
With the new layer selected, go to Erase Tool group from the Tools panel (or press E) and choose Background Erase Tool from the dropdown menu. A context toolbar will become active to allow you to set up the brush parameters.

Step 4: Customize the Brush
Go to the Brush panel and choose a brush. Then, use the context toolbar to set the width, opacity, flow, hardness, and the rest of the brush parameters. Often, you would want to set opacity, flow, and hardness to 100%. The width of the brush depends on the size of the area you want to erase. As the background is usually a large area, start with large width and go from there.
Step 5: Erase the Background
Move the mouse over the area you want to erase until the brush locks over a color. Then, drag the mouse over the area you want to erase. Affinity will erase only pixels of the locked color at the beginning of the dragging. Redo the process until you erase the entire area.

Step 6: Replace the Background
Select the Background layer and go to menu Layer -> New Fill Layer. A white fill layer will appear above the Background layer and below the layer with erased background. Select the fill layer, and a context toolbar will appear to let you set the layer’s parameters. You can adjust the color, add a gradient, and change the orientation.

Step-by-Step: How to Use the Flood Erase Tool to Change the Color of an Object
Step 1: Open the Image in Affinity Photo
Go to File -> Open and choose the image you want to edit.
Step 2: Duplicate the Background Layer
Right-click on the Background layer in the Layer panel and select Duplicate. Alternatively, go to Layer -> Duplicate. Rename the new layer.
Step 3: Add a Fill Layer
With the Background layer selected, go to menu Layer -> New Fill Layer. From the context toolbar or the Color panel, set the color of the Fill layer. If you want a subtle change, set the Fill layer’s opacity to 50%.
Step 4: Select Flood Erase Tool
Go to the Eraser Tool group in the Tools panel (or press E) and select the Flood Erase Tool. Set the tolerance. As you can’t know from the beginning what tolerance you need, this is a try-and-error process. Start with a higher tolerance if the object/area you want to erase has a more uniform and distinct color and with a lower tolerance if the object/area is less smooth and more similar to the surroundings.

Step 5: Erase the Object/Area
Click on the area you want to erase. See how the image changes. If the Flood Erase Tool went too far, undo the step (Ctrl+Z), choose a different tolerance, and try again.
You may want to zoom in for better control and repeat the process until you erase everything that needs to be erased.
Concluding words
The Eraser Tool is an editing tool present in all photo editors. It is straightforward to use, although it may require some precision, patience, and a try-and-error process. But, in the end, you create the subtle or obvious change you are after. Take some time to experiment with different brushes and settings to understand what the Eraser Tool can do for you.
Did you ever use this tool? Tell us in the comment section if it is one of your favorites and for what types of images you use it.