
How To Create an Action in Photoshop CC
When you find that you do the same task over and over again in Photoshop, you should consider creating a Photoshop Action to do the hard work for you. This can save you a lot of time and give you more time to take photos instead of processing them.
This is part of the guide: How to Use Photoshop Actions
How To Create an Action in Photoshop
Step 1: Enable the Action Panel

First of all, enable the Action panel in Photoshop. Press the keyboard shortcut F9 or use the menus: Window > Show Actions.
Now let us take a look at the different buttons at the bottom of the Photoshop Action Panel. All of the commands activated by the buttons can also be accessed in the Action Panel Menu if you prefer this way.

Photoshop Action Panel let's you easily create Photoshop Actions
The main buttons of the Photoshop Action Panel (from left to right you have the buttons): Stop / Record / Play / Create New Action Set / Create New Action / Trash.
Get my eBook: 25 Techniques all Photographers Should Master - for Free
Step 2: Create a New Set to Hold All Your Photoshop Actions

New Action Set dialog in Photoshop Action Panel
Photoshop actions can only exist within a folder, which is called an Action Set in Photoshop. This also helps you keeping organized, especially if you plan on using Photoshop Actions a lot.
So you need to create your first Action Set where you will put all your Photoshop actions.
Click the folder icon at the bottom of the Action Panel to create a New Set. In the dialog type a name for the set that tells you that this is where your own Photoshop actions are stored.
Quick tip: If you use the Alt key (Win) or Option key (Mac) when you click on the New Set button, you will skip the dialog and go with the default name. You can always rename the set later by double-clicking on the name.
Step 3: Start Recording Your First Photoshop Action
To create a new Photoshop action click the New Action button (looks like a page icon, and you will find it next to the trashcan icon). The New Action button will open the New Action dialog, where you can give the new Photoshop action a Name and assign it to an Action Set (which we will cover later). You can also assign a Function key or key combination. Finally, you can also assign a color to the action, but this will only be visible in button mode.
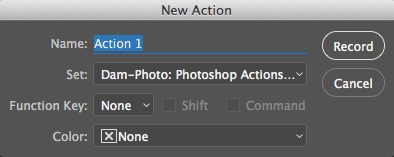
New Photoshop Action Dialog in Photoshop CC
Note to modify a previously recorded or imported action; you need to select the action and click the Record button. Photoshop will then append the steps you record to the currently selected action. If instead of choosing a whole action, select a specific step within an action, Photoshop will insert new steps or commands after the selected action step.
Quick tip: It will often happen that you make small mistakes when recording your actions. Don't worry. You don't have to start over again, but only need to find out where you've made the mistake and correct that.
Step 4: Stop Recording
After finishing the steps you want to include in your action, you can stop it by using the stop button. Otherwise, it will continue to record everything you do in Photoshop until you press stop.
Press the Stop button to end recording or end playing an action that continues to run for a long time, which you for some reason want to cancel. You can also press the Esc key instead of using the Stop button in the Action Panel.
If you at some point need to pause the recording you can also use the Stop button and when you are ready to continue just hit the record button to finish recording your Photoshop action.
Step 5: Test Your Action
After recording your action in Photoshop, you will want to test it. It is best to test it first on the same image, to see if it actually does what you intended. After that test it on another image to get a similar effect or treatment.
You play the action by selecting it and click the Play button.
Note: If instead of selecting an entire action, you choose a single of the sub-steps and hit the Play button Photoshop will begin running the action from the selected step and run until the last action step in the action.
Quick tip: If you only want to play a single action step hold down Cmd (Mac) or Ctrl (Win) and double-click on the particular action step you want to run.
How to Modify Photoshop Actions
To modify the default settings of a Photoshop action, simply unfold the action so you can see the individual steps (not in button mode).
Add Extra Steps
If you want to add more steps in Adobe Photoshop when editing actions, just select the last step and press the Record button. Now you can add as many steps as you like. Press Stop to end the recording.
Modify an Existing Step
Next, double-click on the step you want to re-record. This brings up the relevant dialog boxes for the particular step. Once you click OK in the dialog, the actions stop recording again, so you only alter this specific step.

Taking Your Photoshop Actions a step further
Now that you know the basics of how to work with actions like recording, modifying, and running them, you can begin to learn more advanced uses of Photoshop Actions.
How to Use Modal Controls in Your Photoshop Actions?

Toggle modal dialog on/off in the Photoshop Action Panel
In some cases, you want to have full control of what a particular step in the action does. To be able to modify the settings used by a Photoshop action, you can enable the command's dialog window to appear.
For instance, you might want to play with the gradient bar, when running an action that applies a Sephia effect to your image. In that case, it makes sense to enable the modal dialog for the step that applies the gradient map command.
By default, all dialogs are disabled for actions. However, you can easily enable/disable the modal dialogs by toggling the small dialog icon on the left side of the Action Panel. You can enable the command dialog for a whole action set, an action with all steps within it, or just a particular step depending on where you toggle the modal control on/off.
When the Action Panel shows an empty box, it indicates that modal dialogs for the action/step are disabled, and the Photoshop action will go with the standard settings used when recording the action.
When you toggle on modal dialog, it is indicated by a white modal control icon.
Note: a red modal control icon shows you that some (one or more) dialogs are enabled within that specific action.
In some cases, you might also encounter a gray modal control icon, which usually means that modal controls are enabled, but that the step, action, or action set is set to be excluded from playback.
How to Exclude Action Steps From Running?
If you want to skip a particular action step within an action, you can exclude it by toggling off the checkbox to the far left of the action step.
Excluding a step will remove the checkmark icon for the action step and make a red checkmark icon appear for the parent action indicating that one or more steps within the action are excluded from running.
For instance, you may have an action that does several things, where one of the commands is applying an overall sharpening to the image. If your image has a shallow depth of field that you want to preserve, you might not want to apply an overall sharpening, but instead, apply it locally afterward. Then you can disable the sharpening step to avoid it being applied to this image. Just remember to include the step again after you are done using the action.
Insert a Stop in Your Photoshop Action to Interact with the User

To give instructions to the user before continuing with the action you can insert an action step called a stop. When Photoshop runs an action that includes a stop step, Photoshop will pause the action and display a custom message to the user.
You can insert a stop command in your actions by using the Action Panel Menu and chose Insert Stop... This will bring up a dialog window where you can enter a message to display when the action encounters this stop. The message should tell the user what to do next. Remind the user to press play again after doing the manual work, in order to continue the action.
Allow Tool Recording within Photoshop Actions
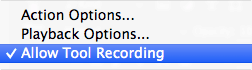
As default Photoshop tools like the pen or brush tool are not recorded in your Photoshop actions. However, if you go to the Action Panel Menu and scroll down to the middle you will find the option Allow Tool Recording. When Allow Tool Recording is checked each stroke with the brush or pen tool will be added in your recorded action as an action step.
How to Run Photoshop Actions Based on Certain Conditions?

Insert conditional dialog in Photoshop Action Panel
Finally, you can make Photoshop run other actions within your action set if certain criteria are met.
For instance, if the current image is Square you can run an action that does something (or choose not to run an action). If else you tell Photoshop to run an action that you already made that will crop your image into a square format.
In this way, you can make 'chains' between your Photoshop actions to ensure your images get the treatment you intend with the Photoshop actions you create. You don't need to use this option, but it can become useful in certain situations.
You can access this option from the Action Panel Menu: Insert Conditional... In the dialog that appears you first have to set the criteria, you want to test for. After choosing the criteria, you need to specify which action (or none) to run if the image meets the condition, and what to do when the condition is not met.

I hope this quite extensive guide to the Photoshop Action Panel helps you create some amazing Photoshop actions.