
How to Create a Vignette in Photoshop
In this post, we will cover the different techniques to create vignettes in Photoshop, to create a more appealing image. But first, let us take a look at what a vignette is and why to use it.
Get my eBook: 25 Techniques all Photographers Should Master - for Free
What is a Vignette?
A vignette in photography is defined as “a small illustration or portrait photograph which fades into its background without a definite border.” It is closely derived from the original meaning of the term in general terms, which is, “a brief evocative description, account, or episode.” Vignetting, in essence, makes the picture itself more evocative than it is originally. Vignetting adds a soft boundary around the edges of the photo making the viewers’ eyes move towards the center of the frame, where the subject is usually sitting.
The Natural Vignette: Lens Vignetting
Naturally, the lenses are sharper and brighter in the middle, while slightly darker and softer towards the edges. The better the lens is, the lesser the vignetting. However, it is a known fact that lens vignetting exists. Often you would actually try to do a lens correction in or add a lens correction filter in Photoshop if the effect is too strong.
However, it is also popular to do the opposite: aim to get the look of a particular vintage lens or a classic lens.
In this Photoshop vignette tutorial, we will cover the different ways you can create a vignette overlay.
How To Make a Vignette in Photoshop CC
Photoshop has way too many ways of doing the same thing. It is all about the comfort of the user as to how they would want to get to the result. It is about comfort and the fact that Photoshop’s intuitive interface helps users develop their own style. Some of the ways to add a vignette effect in Photoshop CC are:
Using Adobe Camera Raw Plug-in to Create Vignettes

Adobe Camera Raw plugin to Photoshop can also create a post-crop vignette
Adobe Camera Raw Plug-in is one of the most complete photo retouching plug-ins in itself. The controls in Adobe Camera Raw parallel that of Adobe Lightroom’s Develop Tab.
In the effects tab, there’s an option of post-crop vignetting. Here, you can add both the black (or dark edges) and the white (or bright edges). There’s an option to control the amount, the feather, the roundness, the highlights, the mid-point, and the style of post-crop vignetting.
The best part about using this plug-in is that it updates the vignette as per the crop. So if you reframe the image later via cropping, the settings will adjust to the effect.
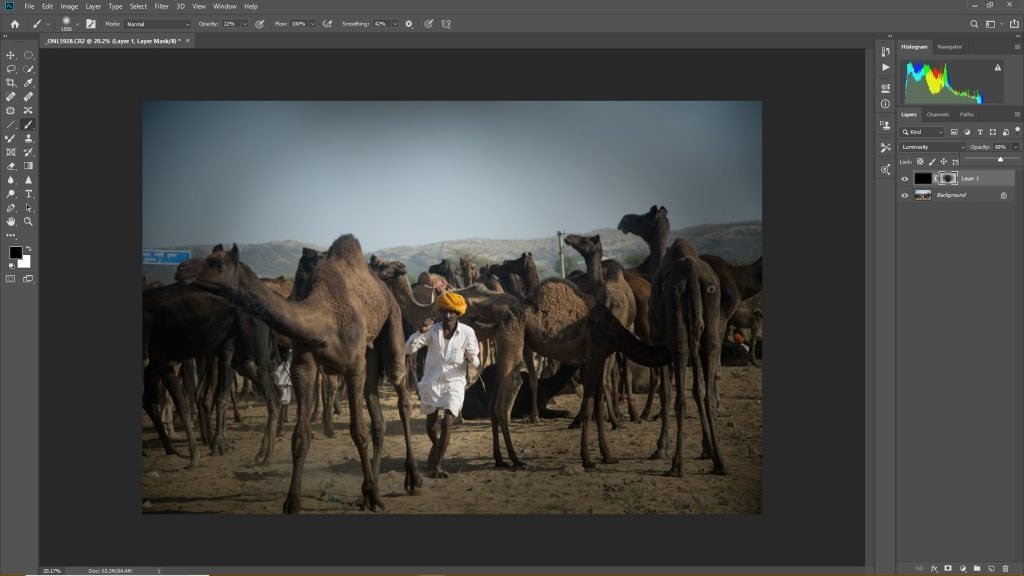
The "Manual" Photoshop Vignette Method: Fill With Black and Mask
Fill color is a tool that is prevalent since Paint and was there in earlier versions of Photoshop. When lesser ways were available for creating a vignette, this was the most prevalent. Even currently, this is arguably the best method to create a customized vignette wherein you don’t necessarily have to follow symmetry or rhythm in search of the perfect frame.
Manual vignette using solid color fill and a mask
Often, the simplest methods are the best.
In this method, you need to add a new layer and fill it with a solid color black (Alt+ Backspace if it is foreground color, and Ctrl + Backspace if it is background color). To set the foreground and background colors to default, hit the D key.
After adding the new layer, add a new mask to the layer. You can do this from the layers panel.
With the layer select, click on the mask icon at the bottom left in the layers panel. Now select a brush with the color set to black. Set the brush opacity to 50% or lower and simply brush through the regions of the frame you want to reveal more, usually the center of the frame.
After you are done, reduce the opacity of the layer. You may also change the blend mode to luminosity to improve the impact and contrast of the frame.

Using Curves or Levels and Mask To Create a Vignette in Photoshop

use the curves tool to create a vignette
Curves isn't originally a tool for this purpose, but Photoshop is a multi-dimensional software.
Similar to using the "fill layer with a solid color" method above, you can add a vignette in Photoshop cc by adding a new curves, levels or exposure adjustment layer.
I.e. using a Curves adjustment layer, pull the curves down from the center to the amount of darkness you are going to require at the edges.
If you instead want to use a Levels adjustment layer, what you need to do is push the whites towards the black side, or the mid-tones towards the black side until you find the "darkness" level you want near the edge of the image.
Once it is achieved, the next part is exactly the same as using the Fill Color method above. You need to simply add a mask and then use the brush tool to reveal the original image.

Photoshop vignette, the good old manual way
You can then reduce the opacity of the curves or levels layer, and adjust it intuitively as per the requirement. You might notice with curves and levels adjustments that the color saturation appears to have increased. It can be used as a tool to improve the look, or you can simply change the blending mode to luminosity to change the look of the image back to normal.
Add Photoshop Vignette Effect Using the Selection Tool
The way we create a vignette with selection gives a more uniform and symmetrical output. It also is a quicker method for faster processing of multiple images. One of the various ways of creating a vignette in Photoshop is through the following steps:

The refine edge tool and layer mask tools are great when doing quality editing.
Select the elliptical marquee tool.
Click on one edge of the frame and drag towards the diagonally opposite edge starting from the top left.
Hit select and mask.
Adjust smooth slightly.
Add feather. The more you feather, the smoother the transition of the vignette will look, and the better the overall result. You can preview it in quick mask mode, where you will be able to see how the final result will look like. The portion in red will be going darker as per the intensity of red, while that without red will remain the same even after applying the vignette.
Hit okay, and the selection will be visible.
Hit Ctrl/Cmd + I. This will invert the selection.
Hit Alt + Backspace and the vignette will be applied.
If you feel the vignette is too hard, you can reduce the opacity. On the other hand, you can increase the opacity by duplicating the layer.
You can also work with layer modes and look through the darkening modes, the overlay modes, and the luminosity modes to get the result you are looking for.

Use selection tools to create a photoshop vignette
The vignette effect is placed on top and affects all layers below down to the background layer.
Photoshop Vignettes by using Gradients
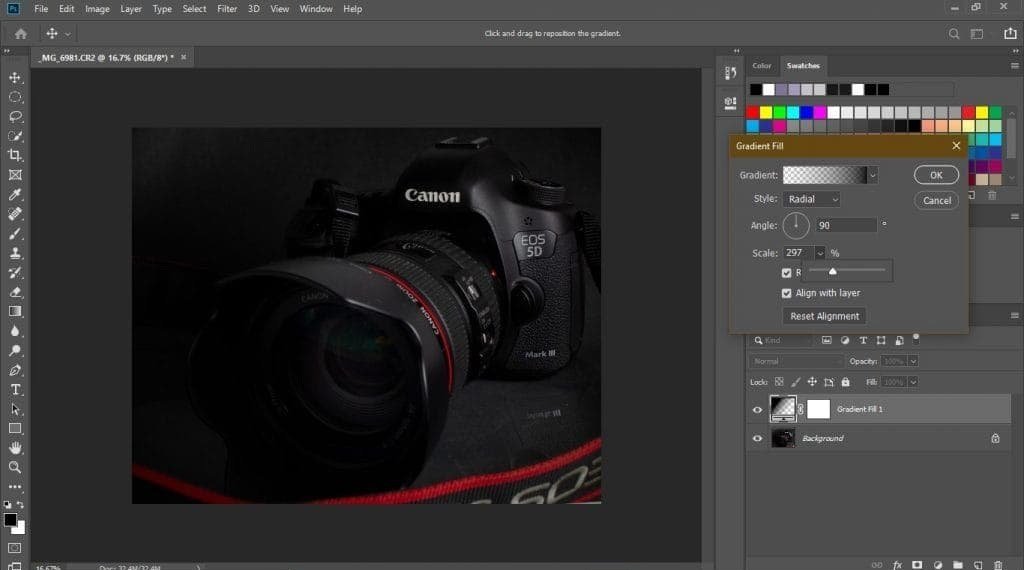
gradient tool
One of the most common ways of adding vignettes is by working with gradients. It is also so because of its ability of it being converted more successfully into action as compared to all the other methods discussed so far.
You can do it in two different ways.
One is by adding a new adjustment layer - Gradient. Once you select Gradient as the adjustment layer, you need to change the mode from linear to radial. You would want to use a black-to-transparent gradient on.
In case the center of the frame is black, you can simply check the reverse and get a proper vignette. Again, you can work with layer modes and opacity, and here you can work on opacity directly in the gradient dialog itself.
A huge advantage of using this method is that in case the subject is slightly off-center, you can move the center of the gradient. When you uncheck ‘align with layer’, and click drag using the left mouse button, you can move the position of the gradient.

gradient fill dialog
Gradients are great at reminding us the product is the boss.
The other method of adding a gradient is directly over the layer. Instead of creating a new adjustment layer, all we need to do is duplicate the layer and hide the original image layer (for backup purposes).
Now, we need to add the effects and check the gradient overlay. Just like the separate gradient setting, we need to simply select transparent to black gradient, and then work with layer modes and opacity. This can be done within the gradient overlay tab itself. You can move the center of the gradient, just like in the gradient method as the adjustment layer.
Using The Shape Tool to Create Vignettes

shape tool is used for both normal vignettes and border vignettes
The shape tool does more than it was made for. It works the same way as the selection tool in the creation of vignette.
Apart from being a fast and quick way of achieving a consistent and smooth result, it provides options to alter the shape we create, and thus providing a versatile vignetting tool.
The most common way of adding a vignette via the shape tool is to create an elliptical shape tool from one corner to its diagonally opposite end.
Now fill it with black, and instead of the normal mode, change it to subtract mode. Now there will be a sharp black elliptical edge to the photo.
To make it smoother, you can go to the properties and hit the mask tab. There, you can play with the opacity via the density slider. However, the main concern is the feather slider. With the feather slider, you can make the vignette really smooth, and reach our final result.
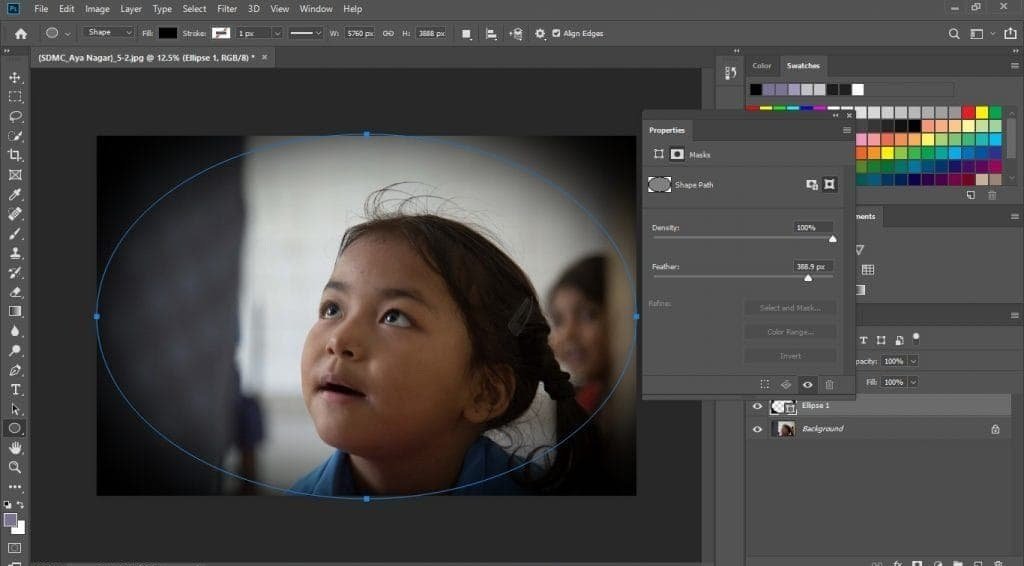
Use the shape tool to create a Photoshop vignette
Once this is done, you can edit the shape in various ways, and the vignetting effect will automatically sync with the shape. Hence, we can transform the shape in any way, or even change the shape by double-clicking it and reaching the edit handles of the shape.
Vignettes for Framing: Some of the Ways
You can also create a dark vignette border in Photoshop for framing your images. Some of the vintage effects involve these rectangular frames we have across the image. We can achieve this via the vignetting results options only.
One of the ways to do it is again, via the shape tool. This time, instead of taking the ellipse shape, we take the rounded rectangle shape. A rounded rectangle allows for sight curvature at the edges, and thus providing more options to create some more classic frames. Just like in the case of elliptical shape, you should change the mode to subtract.

create a dark border using the shape tool
Turn your pictures vintage.
However, when the goal is to create a frame using a vignette method, don't mess with the feather slider. Now if we reduce the opacity of the shape layer, we will have some part of the image being revealed, giving us a quick and cool frame effect.
These methods would work equally well while creating a bright vignette (the white ones). Although less popular, some places require us to use those effects. Our process will remain the same, except for the color selection. The blend modes to use would be normal, lighten, overlay or luminosity.
Concluding words
As usual, there are many ways in Photoshop to achieve similar results. This is also the case with Photoshop vignettes. As mentioned in the beginning a vignette help to bring the attention of the viewer towards the main subject in your image. Remember subtlety is key when it comes to creating vignettes no matter if you use Photoshop or any other photo editor.